

Now that you (maybe) have all recovered from the Halloween onslaught of tutorials, I thought I might try another one, because now we can all start thinking about Christmas. Yes I said it, sorry not sorry.
I also got my first proper brush set the other day, having previously used an interesting assortment acquired at random from various people, but which did not actually include any eye brushes. I chose the new Real Techniques Nic's Picks, partly because it is a third off at Superdrug atm, but also because it includes the two main things I wanted, a general fluffy eyeshadow brush and an angled crease brush, as well as three whole other brushes!
This came about because I wanted to do a pinky-purple look to bring out green eyes, but in fact this is a sort of shimmery pink look rather than the purple smoky eye I was originally going for... I really do think this would be a good Christmas party look, maybe for when you want to look great but not super super dramatic. I will be doing the purple smoky eye in due course when I get some purple eyeshadow that isn't metallic or shimmery or iridescent or everything other than matte.
This came about because I wanted to do a pinky-purple look to bring out green eyes, but in fact this is a sort of shimmery pink look rather than the purple smoky eye I was originally going for... I really do think this would be a good Christmas party look, maybe for when you want to look great but not super super dramatic. I will be doing the purple smoky eye in due course when I get some purple eyeshadow that isn't metallic or shimmery or iridescent or everything other than matte.
Having said that this came about for my green eyes, this would definitely suit other eye colours too - for blue eyes you can take it quite pink and/or slightly brown, for brown eyes you could go really bright purple and for hazel eyes again I would pull it towards the pinker end.
 The first step is to cover everywhere with a good eye primer - I use e.l.f. After this it can also be a good idea to create a clean base with an eyeshadow in your skintone. I used Ivory by Bobbi Brown.
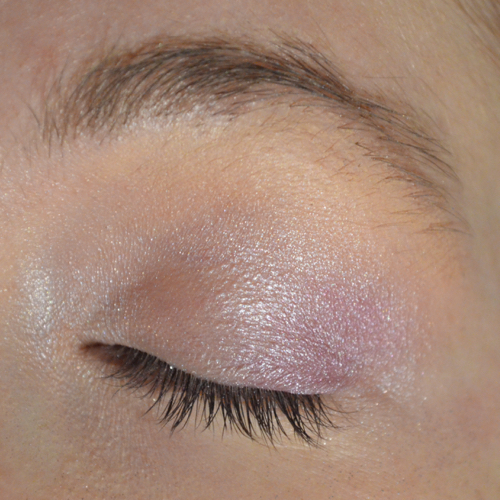
 Then take a pale pinky-purple all over the eye, as high as you want. I would rather have used a matte here but actually only had a shimmer, for that maybe don't take it right up to the brow, but otherwise as much as you want. This should be your most neutral, muted colour, so the least purpley-pinky one. I used a Benefit one that was a bit irridescent, and ended up going over the top of it with Bobbi Brown's (matte) Baby Pink to try to tone it down a bit.
Add a shimmery lilac over your lid, bringing it just high enough to see with your eyes open but not as much as the previous colour. I used Urban Decay's Grifter, from their Ammo palette. You could then go straight to your dark colour for the crease, but to make it more purple I here added a bright purple to the outer third of the eyelid. If you go too dark here then the crease won't show up as well, but a bright purple is really good. I used Pizzaz Purple from MUA's Poptastic palette.

All of these colours I have been applying with the Real Techniques Base Eyeshadow Brush from the Nic's Picks selection. Strictly speaking you should use different brushes, but so long as you're working from light to dark/pale to bright it doesn't matter too much, and who has the time or money for millions of brushes? I just dust excess off on the back of my hand.

At this point though, I switched to the Angled Shadow Brush from the same collection to do my crease. I also took a darker shade here, Last Call by Urban Decay, which is a richer purply pink, with bronze running through it. Hard to describe, but beautiful. I took this through the crease, about two-thirds through, and drew it back into the outer corner of my eye to make a little wing (does that make sense??). The benefit of using the extra shade before this is that you can blend it all together and get more of a smokey eye wing going on than the crease that I always go for (branching out!), so that's exciting.
After that, I switched brush again (get me) to the Eyeliner Brush, but using the same eyeshadow took it partway along the upper lash line and most of the way along the lower line. If you have bigger eyes, feel free to take it all along both upper and lower lash lines, or all along the upper and partway along the lower - see what suits you best! I joined the lower lash line up with the wing I made earlier with the angled brush, mine is an upturned wing but you could also go straight out.
 You could now go straight on with mascara, especially if you're using a really dark purple eyeliner, or if you're going to add false lashes, but I did a bit of liquid liner. I took a black liner along my upper lash line and out into just a tiny little flick. I also tried it along the bottom lash line, but this just went over the purple and also made my poky eyes look even smaller, so I took it off and went just back to the eyeshadow as a liner. This also means you have the purple/pink right next to your eye, which brings out the colour of your iris more.
The final step, and frankly the one that changes this from making you look a bit ill to making it look super hot, is loads of mascara. Just pile it on. Add false lashes too if you want.

Now that the eyes are done I will just add a couple of notes about the rest of the face. I found that this was making my face look a little pink, so I popped a more yellow-toned foundation over my red patches. My most yellow-toned is L'Oreal True Match in Rose Ivory, which is not very yellow toned really but my skin is super pink and it's the most I can get away with. Concealer-wise something like Rimmel's Wake Me Up would be great, as would the foundation if they have a suitable shade for you (they do not me sadly).
As far as blusher/bronzer goes, this sort of depends on the event you're doing this for, I toned it down a bit using matte bronzer and just a teeny tiny bit of a coral-y blusher, avoiding pink again.
Eyebrows you can take as heavy or light as suits your face, again apologies for mine being a mess still, apparently I still have 6 months to go there...

 Then take a pale pinky-purple all over the eye, as high as you want. I would rather have used a matte here but actually only had a shimmer, for that maybe don't take it right up to the brow, but otherwise as much as you want. This should be your most neutral, muted colour, so the least purpley-pinky one. I used a Benefit one that was a bit irridescent, and ended up going over the top of it with Bobbi Brown's (matte) Baby Pink to try to tone it down a bit.
Add a shimmery lilac over your lid, bringing it just high enough to see with your eyes open but not as much as the previous colour. I used Urban Decay's Grifter, from their Ammo palette. You could then go straight to your dark colour for the crease, but to make it more purple I here added a bright purple to the outer third of the eyelid. If you go too dark here then the crease won't show up as well, but a bright purple is really good. I used Pizzaz Purple from MUA's Poptastic palette.
All of these colours I have been applying with the Real Techniques Base Eyeshadow Brush from the Nic's Picks selection. Strictly speaking you should use different brushes, but so long as you're working from light to dark/pale to bright it doesn't matter too much, and who has the time or money for millions of brushes? I just dust excess off on the back of my hand.

At this point though, I switched to the Angled Shadow Brush from the same collection to do my crease. I also took a darker shade here, Last Call by Urban Decay, which is a richer purply pink, with bronze running through it. Hard to describe, but beautiful. I took this through the crease, about two-thirds through, and drew it back into the outer corner of my eye to make a little wing (does that make sense??). The benefit of using the extra shade before this is that you can blend it all together and get more of a smokey eye wing going on than the crease that I always go for (branching out!), so that's exciting.

After that, I switched brush again (get me) to the Eyeliner Brush, but using the same eyeshadow took it partway along the upper lash line and most of the way along the lower line. If you have bigger eyes, feel free to take it all along both upper and lower lash lines, or all along the upper and partway along the lower - see what suits you best! I joined the lower lash line up with the wing I made earlier with the angled brush, mine is an upturned wing but you could also go straight out.
 You could now go straight on with mascara, especially if you're using a really dark purple eyeliner, or if you're going to add false lashes, but I did a bit of liquid liner. I took a black liner along my upper lash line and out into just a tiny little flick. I also tried it along the bottom lash line, but this just went over the purple and also made my poky eyes look even smaller, so I took it off and went just back to the eyeshadow as a liner. This also means you have the purple/pink right next to your eye, which brings out the colour of your iris more.
The final step, and frankly the one that changes this from making you look a bit ill to making it look super hot, is loads of mascara. Just pile it on. Add false lashes too if you want.

Now that the eyes are done I will just add a couple of notes about the rest of the face. I found that this was making my face look a little pink, so I popped a more yellow-toned foundation over my red patches. My most yellow-toned is L'Oreal True Match in Rose Ivory, which is not very yellow toned really but my skin is super pink and it's the most I can get away with. Concealer-wise something like Rimmel's Wake Me Up would be great, as would the foundation if they have a suitable shade for you (they do not me sadly).
As far as blusher/bronzer goes, this sort of depends on the event you're doing this for, I toned it down a bit using matte bronzer and just a teeny tiny bit of a coral-y blusher, avoiding pink again.
Eyebrows you can take as heavy or light as suits your face, again apologies for mine being a mess still, apparently I still have 6 months to go there...

 |
| 630 Nude Perfection |
 |
| 210 Keep it Classy |
Ed. (16/11/14) - I got the 'minimal' lip colour wrong, it is 630 Nude Perfection not Minimalist, sorry!
I love your minimal style , thats the style I always go for too. xox
ReplyDeletehttp://rainbowsandunicorns27.blogspot.co.uk/
Thank you Marie! I am trying to be brave doing eye makeup but I usually just do lips haha x
Delete